웹 소켓(Web Socket)을 이용해 로컬 환경에서 채팅 구현하기
1. 웹 소켓이란?
웹 소켓(Web Socket)은 웹 브라우저와 웹 서버 간의 실시간 양방향 통신을 가능하게 하는 프로토콜입니다. 이는 기존의 HTTP 프로토콜보다 더 효율적이며, 실시간으로 데이터를 주고받아야 하는 상황에서 주로 사용됩니다. 일반적인 HTTP 통신은 클라이언트가 서버에 요청을 보내면 서버가 응답을 보내는 단방향 통신을 기반으로 합니다. 그러나 웹 소켓은 클라이언트와 서버 간에 양방향 통신 채널을 열어놓고, 클라이언트나 서버가 언제든지 데이터를 보낼 수 있는 기능을 제공합니다.
웹 소켓은 실시간 채팅 애플리케이션, 온라인 게임, 주식 시장 모니터링 등 실시간 업데이트가 필요한 다양한 웹 애플리케이션에서 사용됩니다. 이러한 애플리케이션에서는 사용자가 즉각적으로 데이터를 수신하고 전송할 수 있어 훨씬 더 반응성 있는 경험을 제공할 수 있습니다. 웹 소켓은 일반적으로 웹 브라우저에서 지원되며, JavaScript를 사용하여 클라이언트 측에서 쉽게 구현할 수 있습니다. 웹 서버 측에서도 웹 소켓을 지원하기 위한 라이브러리나 프레임워크가 다양하게 제공되고 있습니다.
2. 프로젝트 환경 설정
2.1 롬복 설치
롬복은 자바 코드에서 반복적으로 작성해야 하는 코드를 자동으로 생성해주는 라이브러리입니다.
롬복 다운로드 : https://projectlombok.org/download
위 링크에서 lombok.jar 파일을 다운로드 후 이클립스가 설치된 폴더로 이동시켜 설치합니다.
설치 방법 참고 블로그 : https://congsong.tistory.com/31
프로젝트에 롬복을 추가하기 위해 `pom.xml` 파일에 다음 의존성을 추가합니다.
<dependency>
    <groupId>org.projectlombok</groupId>
    <artifactId>lombok</artifactId>
    <version>1.18.30</version>
    <scope>provided</scope>
</dependency>
2.2 웹 소켓 의존성 추가
웹 소켓을 사용하기 위해 Spring Boot 프로젝트의 `pom.xml` 파일에 다음 의존성을 추가합니다.
<dependency>
    <groupId>org.springframework.boot</groupId>
    <artifactId>spring-boot-starter-websocket</artifactId>
</dependency>
3. 웹 소켓 설정
3.1 WebSocketConfig.java
WebSocketConfig 클래스를 생성하여 웹 소켓 설정을 정의합니다. 이 클래스는 WebSocketMessageBrokerConfigurer 인터페이스를 구현합니다.
package spring.config;

import org.springframework.beans.factory.annotation.Autowired;
import org.springframework.context.annotation.Configuration;
import org.springframework.messaging.simp.config.MessageBrokerRegistry;
import org.springframework.web.servlet.config.annotation.InterceptorRegistry;
import org.springframework.web.socket.config.annotation.EnableWebSocketMessageBroker;
import org.springframework.web.socket.config.annotation.StompEndpointRegistry;
import org.springframework.web.socket.config.annotation.WebSocketMessageBrokerConfigurer;

import lombok.RequiredArgsConstructor;
import spring.common.web.LogonCheckInterceptor;

@RequiredArgsConstructor
@Configuration
@EnableWebSocketMessageBroker
public class WebSocketConfig implements WebSocketMessageBrokerConfigurer {

    @Override
    // 클라이언트가 메시지를 구독할 endpoint를 정의합니다.
    public void configureMessageBroker(MessageBrokerRegistry config) {
        config.enableSimpleBroker("/send");
    }

    @Override
    // connection을 맺을때 CORS 허용
    public void registerStompEndpoints(StompEndpointRegistry registry) {
        registry.addEndpoint("/").setAllowedOrigins("http://localhost:8000/index.js").withSockJS();
        //registry.addEndpoint("/").setAllowedOrigins("*").withSockJS();
    }
}
3.2 WebSocketApplication.java
package spring;

import org.springframework.boot.SpringApplication;
import org.springframework.boot.autoconfigure.SpringBootApplication;
import org.springframework.context.annotation.Bean;
import org.springframework.scheduling.annotation.EnableScheduling;
import org.springframework.web.socket.server.standard.ServerEndpointExporter;

@SpringBootApplication
@EnableScheduling
public class WebSocketApplication {

    public static void main(String[] args) {
        SpringApplication.run(WebSocketApplication.class, args);
    }
    @Bean
    public ServerEndpointExporter serverEndpointExporter() {
        return new ServerEndpointExporter();
    }
}
4. 채팅 처리
4.1 MessageController.java
WebSocket 엔드포인트를 처리할 MessageController 클래스를 생성합니다. 이 클래스는 클라이언트로부터 메시지를 받아서 다른 클라이언트에게 전송합니다.
package spring.web;

import java.io.IOException;
import java.net.Socket;
import java.util.ArrayList;
import java.util.List;

import javax.websocket.OnMessage;
import javax.websocket.OnOpen;
import javax.websocket.Session;
import javax.websocket.server.ServerEndpoint;

import org.springframework.stereotype.Controller;
import org.springframework.web.bind.annotation.GetMapping;

@Controller
@ServerEndpoint("/websocket")
public class MessageController extends Socket {
    private static final List<Session> session = new ArrayList<Session>();

    @GetMapping("/")
    public String index() {
    	return "redirect:index.jsp";
    }

    @OnOpen
    public void open(Session newUser) {
        System.out.println("connected");
        session.add(newUser);
        System.out.println(newUser.getId());
    }

    @OnMessage
    public void getMsg(Session recieveSession, String msg) {
        for (int i = 0; i < session.size(); i++) {
            if (!recieveSession.getId().equals(session.get(i).getId())) {
                try {
                    session.get(i).getBasicRemote().sendText("상대 : "+msg);
                } catch (IOException e) {
                    e.printStackTrace();
                }
            }else{
                try {
                    session.get(i).getBasicRemote().sendText("나 : "+msg);
                } catch (IOException e) {
                    e.printStackTrace();
                }
            }
        }
    }
}
5. 프론트엔드 구현
5.1 index.jsp
웹 소켓 통신을 위한 프론트엔드 코드를 작성합니다.
<body>
    <input type="text" placeholder="메시지를 입력하세요." class="content">
    <button type="button" class="sendBtn" onclick="sendMessage()">전송</button>
    <div class="msgArea"></div>
</body>
<script>
    let socket = new WebSocket("ws://localhost:8000/websocket");

    socket.onopen = function (event) {
        console.log("웹 소켓 연결 성공!");
    };

    socket.onerror = function (error) {
        console.log(`에러 발생: ${error}`);
    };

    socket.onmessage = function (event) {
        let msgArea = document.querySelector('.msgArea');
        let newMsg = document.createElement('div');
        newMsg.innerText = event.data;
        msgArea.appendChild(newMsg);
    };

    function sendMessage() {
        let content = document.querySelector('.content').value;
        socket.send(content);
    }
</script>
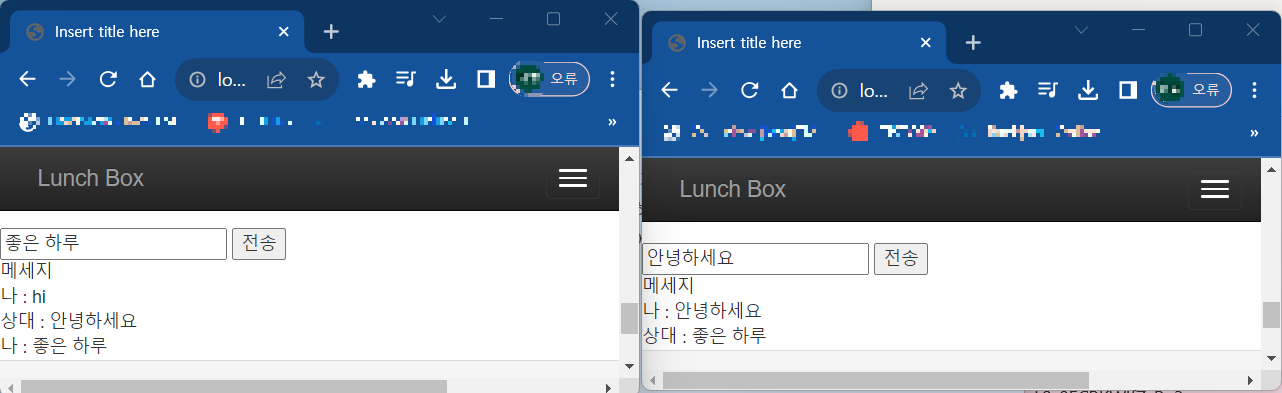
이제 위의 코드를 참고하여 로컬 환경에서 웹 소켓을 이용한 실시간 채팅 애플리케이션을 구현할 수 있습니다. 구현 결과는 아래와 같습니다.